


iRocket LocSpoof is a location changer that allows you to easily change your GPS location without rooting or jailbreaking your phone. Compatible with popular location-based apps like Pokémon GO, Find My, Life360, and Tinder, it makes location spoofing a breeze.
Get Started
Before you dive into changing your GPS location, let’s set everything up. This section will guide you through launching the iRocket LocSpoof app and connecting your Android or iOS device to your PC. Follow these steps to ensure a smooth start and unlock the full potential of your location changer!
1 Launch iRocket LocSpoof
Install and launch iRocket LocSpoof, and click on Get Started.

2 Connect Your Device
For iOS
First connection: Connect your iOS device to the computer via a USB cable. Next, unlock the device. Tap Trust on your iPhone when it asks you to Trust This Computer. Enter the screen passcode again to complete this process.

Second connection: After successfully connecting the device via USB cable for the first time, you can directly choose to connect your iOS device to the computer under the same WiFi network next time.
Note
1. The iOS device and the computer should be connected to the same WiFi.
2. Always keep your iPhone/iPad/iPod touch screen on when connecting to WiFi. (how to keep iOS screen always on)
For Android
You can connect to iRocket LocSpoof using either a USB connection or Wi-Fi.
- USB connection: Connect your Android device to the computer via a USB data cable to select the USB connection.
- WiFi connection: Make sure the Android device and computer are connected to the same WiFi network, then you can choose WiFi connection.

After choosing the device, please open USB debugging according to the guide in the program.
Ensure that the mobile phone's USB connection mode is Media Transfer Protocol (for LG mobile phones, it should be set as Picture Transfer Protocol). The steps to set USB connection mode maybe different among different phone brands. Generally speaking, you can fall out of the notification bar, and then find the USB connection mode option.

Tap 7 times Build Number (or "System versions") to open the developer mode, and then enter Developer option, find and open USB debugging (Some Android phones will also need to turn on "Allow to install apps via USB").

Confirm Allow USB debugging on your mobile phone.

If the popup is not shown on your device, click Show Again and you can see it.

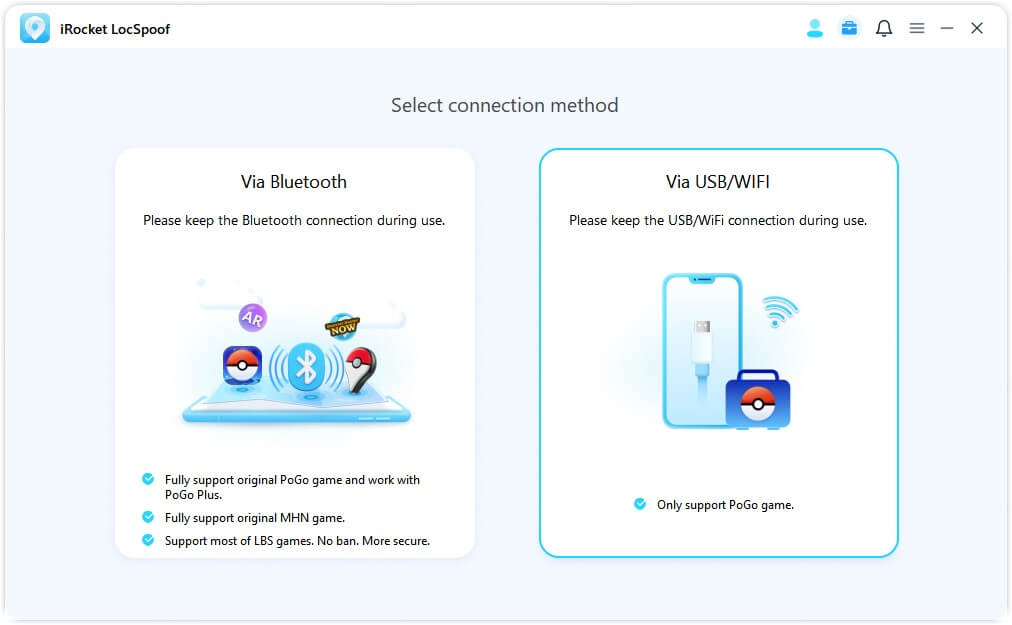
In this mode, you can choose between Bluetooth or USB/WiFi connection options.
Method 1 Via Bluetooth
LocSpoof’s exclusive Bluetooth connection method brings extra security and convenience, allowing you to change your location directly within the official versions of games—no cracked apps required! Whether you’re exploring Pokémon GO, hunting in Monster Hunter Now, or using peripherals like PG Plus, this feature ensures a seamless experience with most LBS games.
Note
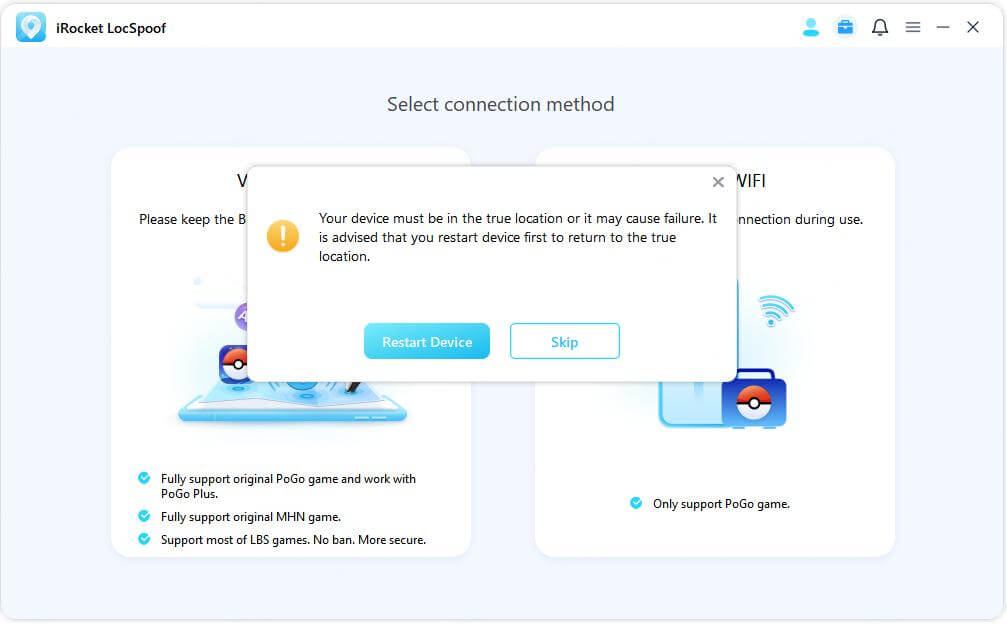
Please keep the Bluetooth connection active during use, as disconnecting it may cause the location to revert to the real one.
To change your location over a long distance (greater than 20km) with LocSpoof, follow these steps:
- Restart the Device: Before connecting via Bluetooth, restart your device to ensure its location is set to the real position. If you're confident the location is already accurate, you can skip this step.
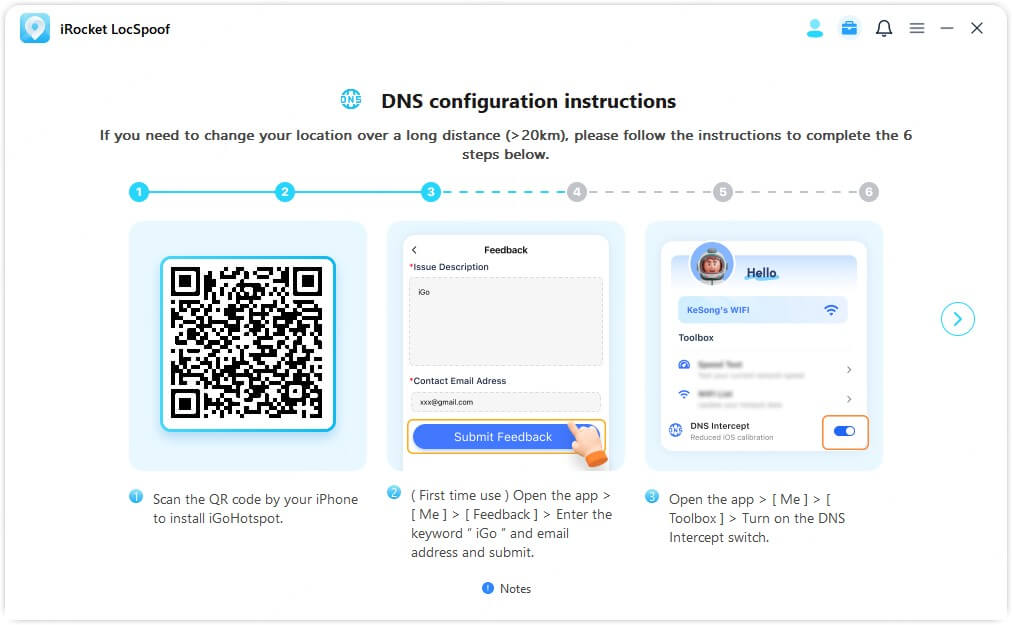
- Complete DNS Configuration
- 1) Install the App: Scan the QR code with your iPhone to install iGoHotspot. (Ensure you have the latest version, iGoHotSpot V1.2.0.)
- 2) Initial Setup (First-Time Use): Open the app > Tap Me > Feedback > Enter the keyword “iGo” and your email address, then submit.
- 3) Enable DNS: Open the app > Go to Me > Toolbox > Turn on the DNS switch.
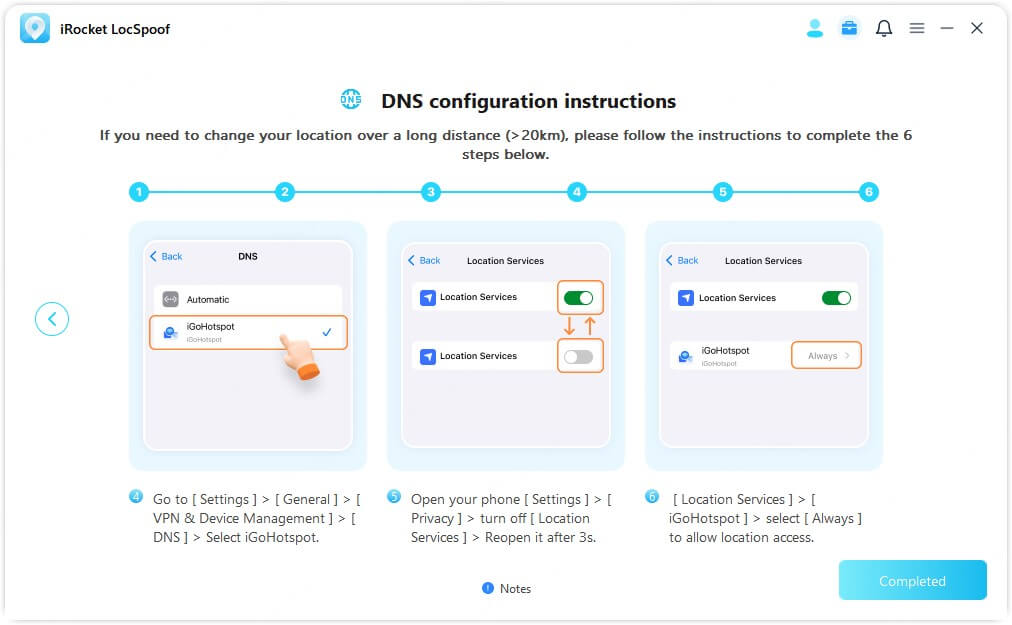
- 4) Configure DNS Settings on Your iPhone: Navigate to Settings > General > VPN & Device Management > DNS > Select iGoHotspot
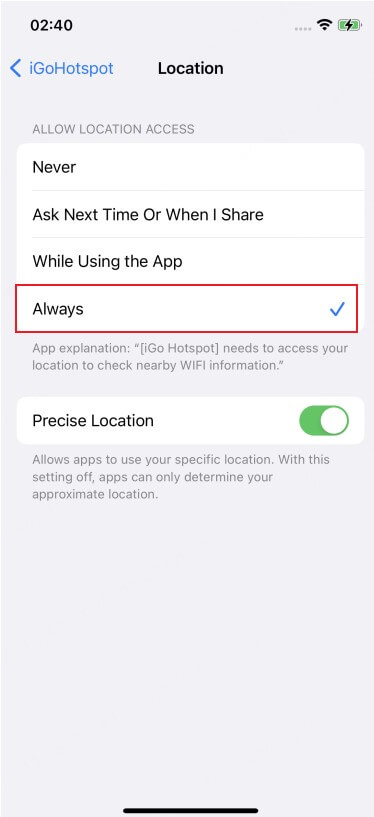
- 5) Adjust Location Services: Go to Privacy & Security and turn off Location Services > Wait for 3 seconds, then turn Location Services back on > Under Location Services, find iGoHotspot and set it to Always.
- For future use, simply open iGoHotspot, enable the DNS switch, and refresh your location services.
- During operation, ensure you don't disconnect the Bluetooth or DNS connection, and keep iGoHotspot running in the background.
- Be aware that configuring DNS may affect Apple services; you can disable the DNS once you're finished.
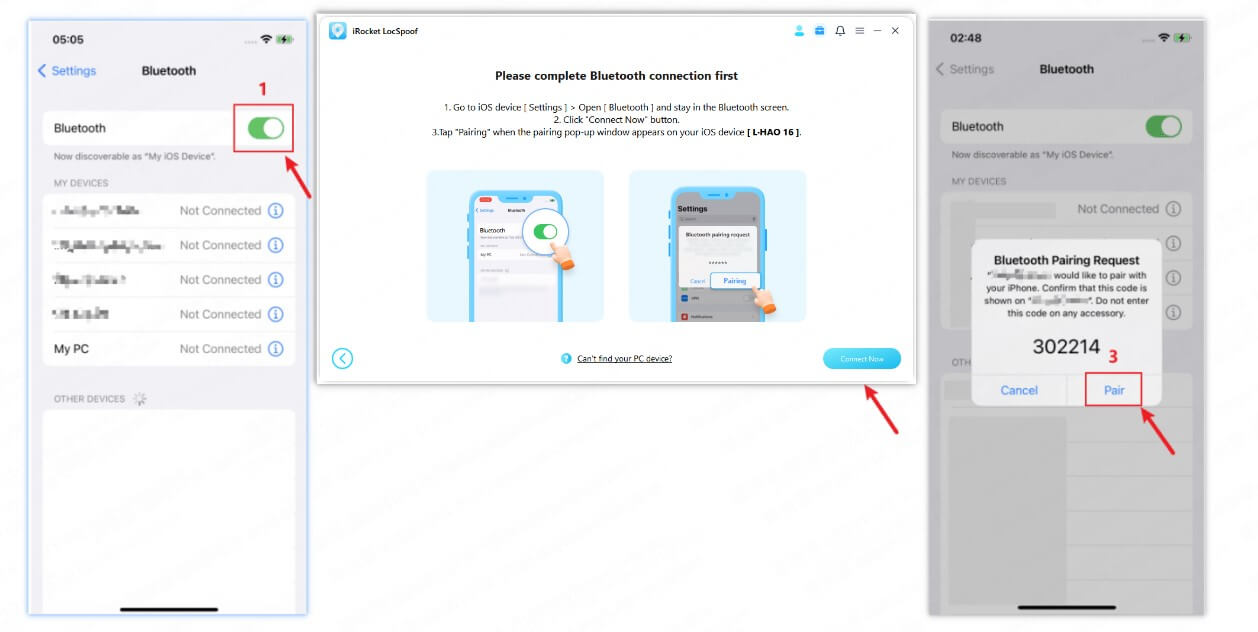
- Complete Bluetooth Connection: On your iOS device, enable Bluetooth in Settings and stay on the Bluetooth screen. Then, on your PC, click the "Connect Now" button to confirm the connection. When a Bluetooth pairing request appears on your iOS device, tap "Pair" to complete the pairing process.
Note
Note
If you're using a Mac, and the system displays a Bluetooth access request, click "Allow." If no prompt appears, open System Preferences, go to Security & Privacy > Privacy > Bluetooth, and manually grant access.
Troubleshooting Bluetooth Connection
Method 2 Via USB/WiFi
USB or WiFi for connection supports only custom PoGo games. Once you enter the map, follow the on-screen prompts provided by the PoGo Assistant to install the latest custom game version for a smoother connection. Be sure not to disconnect USB or WiFi during use.
- Click the USB/WiFi option to begin the connection process.
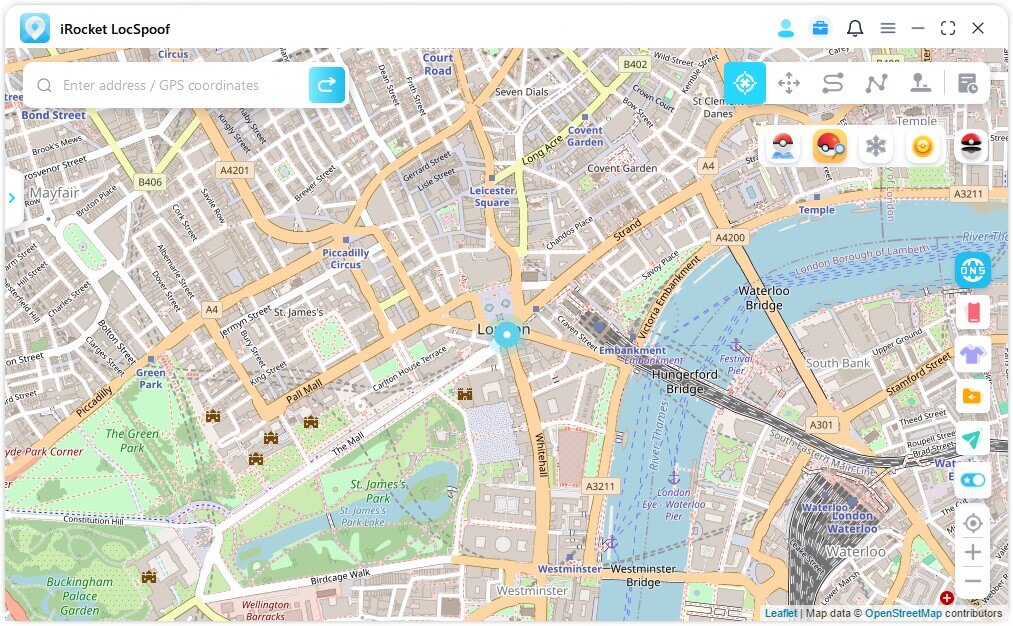
- Wait for the map to load completely; once loaded, your current location will be displayed on the map.
Select Mode
1 Universal Mode
Click on the Universal Mode option. Once the map begins to load, you're officially in the Mode.
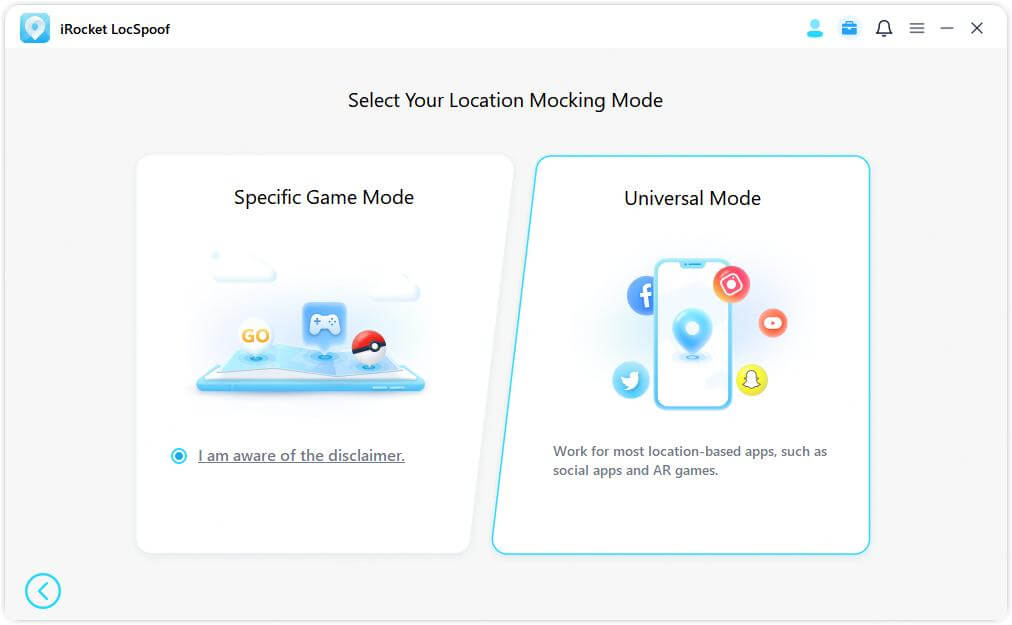
Note
The Universal mode is compatible with most location-based apps, including social platforms like Google Maps, Facebook, and WhatsApp, as well as AR games.
2 Specific Game Mode
Review the disclaimer, then click on "Specific Game Mode".
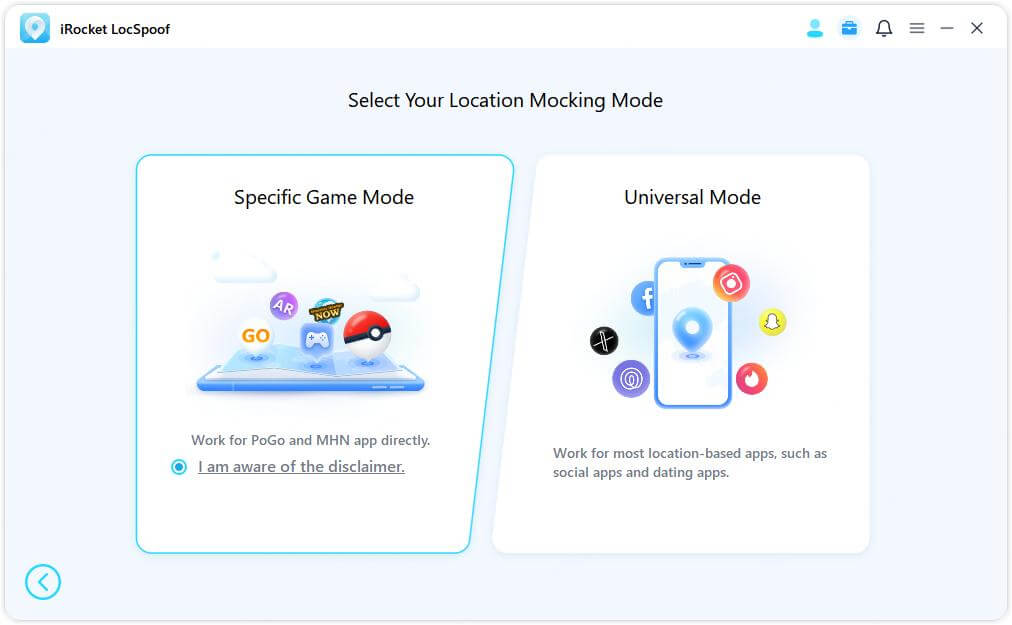
Note
The Specific Game mode supports most LBS games, including Pokémon GO and Monster Hunter Now.
Change Location
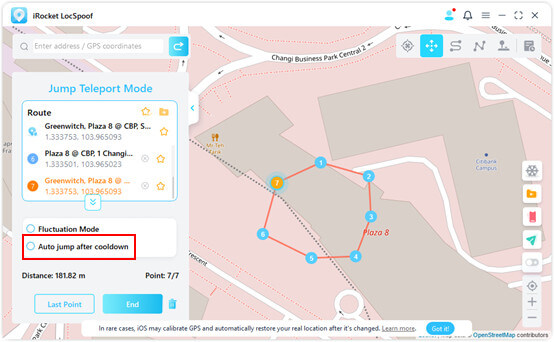
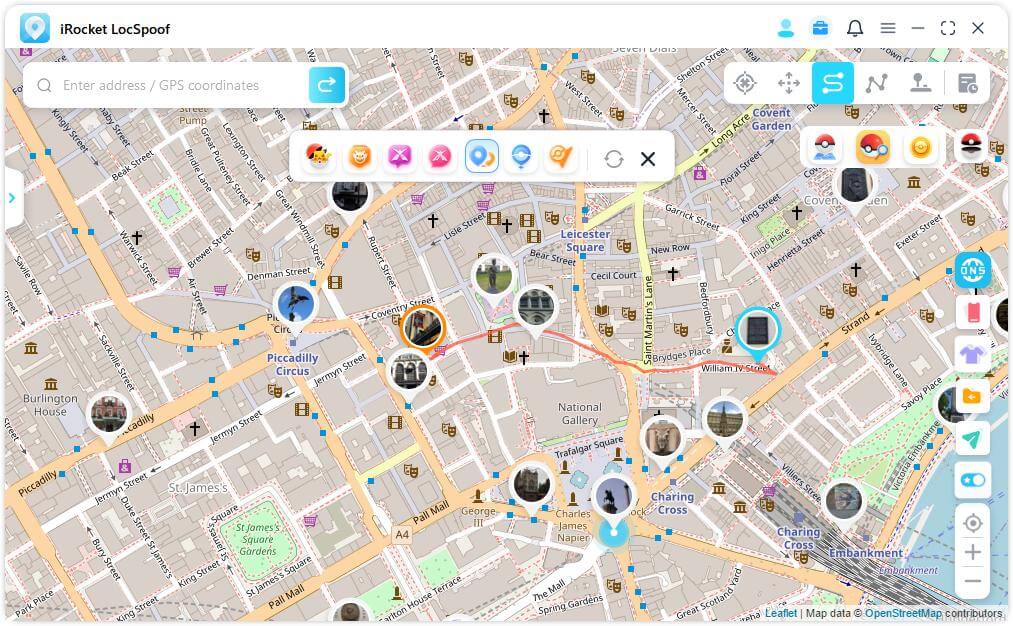
1 Teleport Mode
If you want to create a custom jump teleport route, choose Teleport Mode.
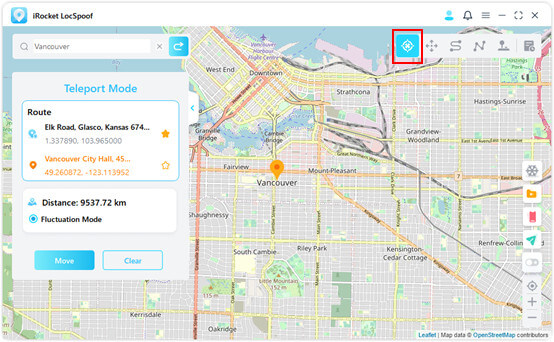
On the map, tap to select each teleportation point in the order you wish to traverse, or enter an address/GPS coordinate to set a specific point. Once your route is set, tap "Move" to jump to the next point. You can freely switch between the previous and next points as needed.
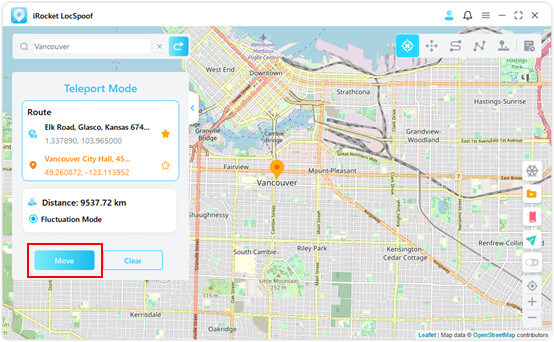
To finish your route, jump to the final point and tap "End."
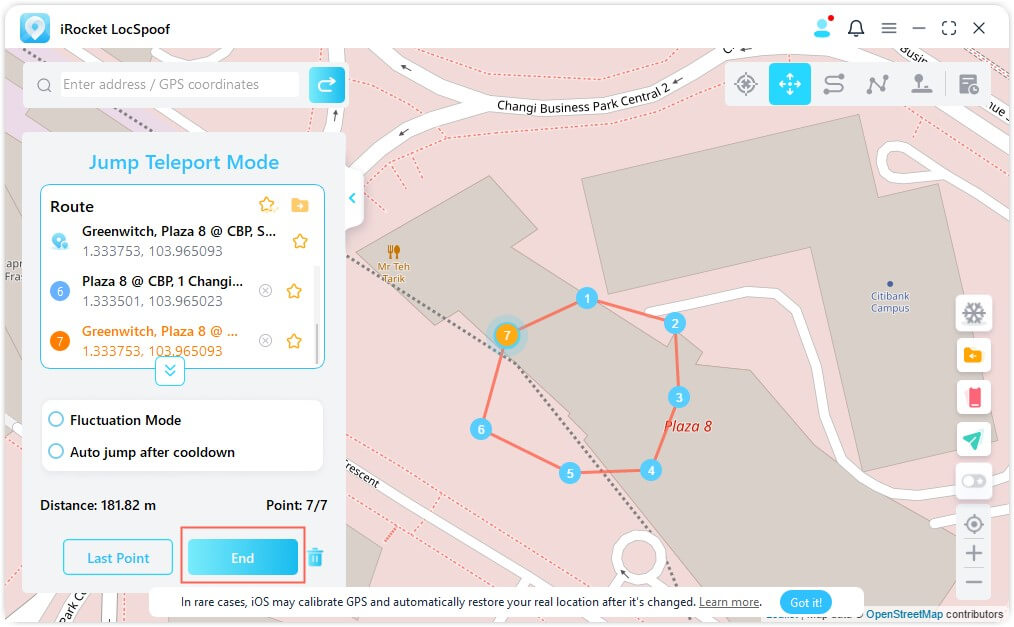
Additionally, before starting, you can enable "Auto-Jump After Cooldown," which will automatically advance through your route based on a cooldown timer until complete.
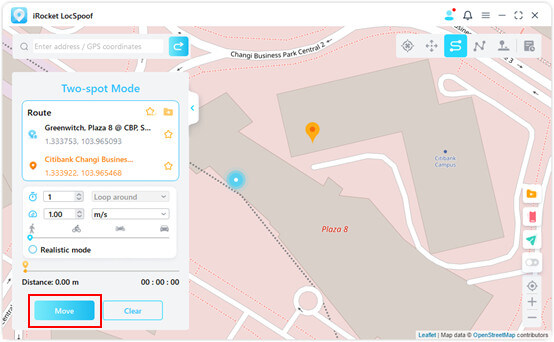
2 Two-spot Mode
You can now set up the number of times for the virtual route to move back and forth between the two places. Drag the Speed bar to customize your moving speed.
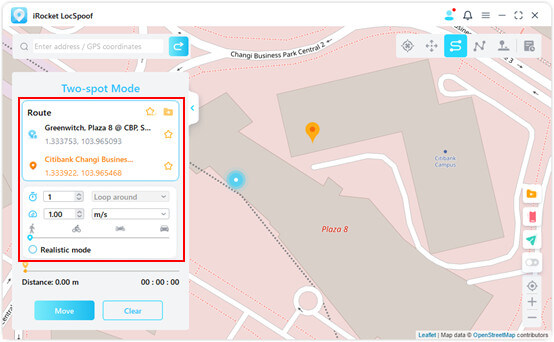
When it is all set up, click Move to start simulating the movement. You can see the distance and time change as it moves.
3 Multi-spot Mode
In Multi-Point Mode, you can simulate a custom GPS route by selecting each location you wish to traverse on the map—or by entering an address or GPS coordinates directly.
Set the number of round trips by entering a value, and adjust the speed using the slider. Once your trip count and speed are configured, tap "Move" to start your journey.
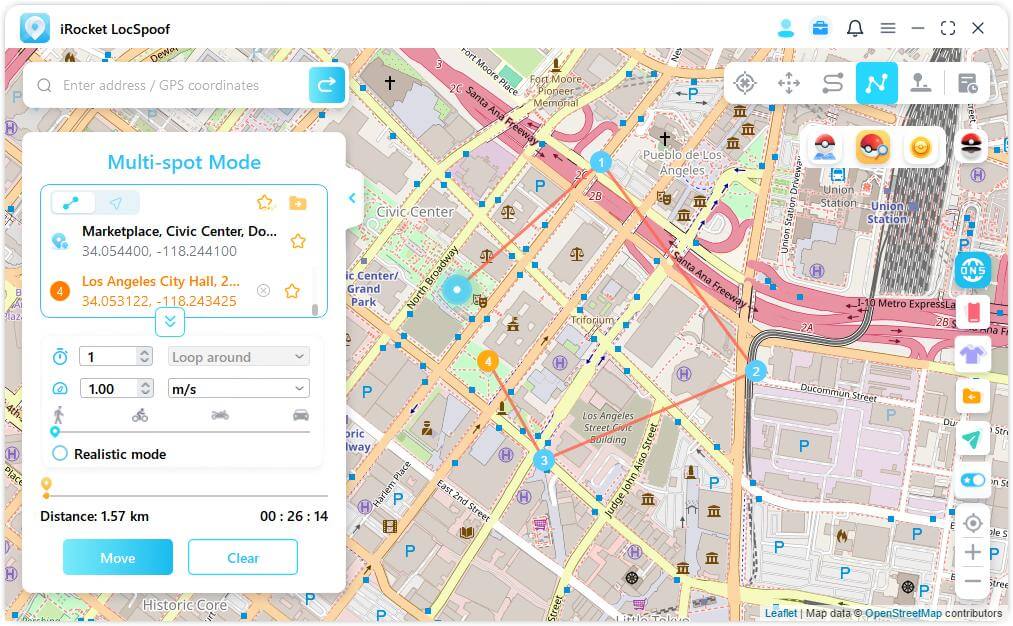
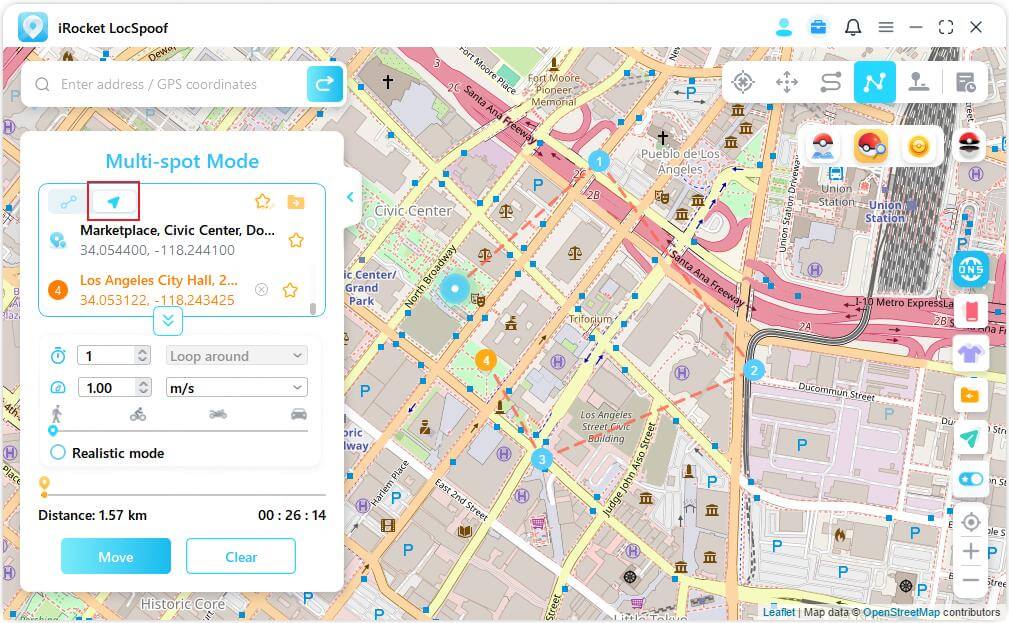
By default, the route follows a straight line; however, you can switch to Navigation Mode, where the app plans a route based on your set speed (for example, a walking route if the speed is set accordingly).
LocSpoof will then simulate movement at your chosen speed, allowing you to enjoy all location-based AR games without physically moving.
4 Joystick Mode


Special Features
1 Circle Route
Under Multi-spot mode, when the starting point and the end point are nearby, the program will automatically ask if you need to create a circle route. Click Yes, it will align the starting point and the end point; click No, the end point will keep the exact coordinates.

2 Realistic Mode
Check Realistic Mode, and then moving speed will randomly vary in the upper or lower 30% of selected speed range. The speed varies every 5 seconds.

3 Returns or Loops
When the times are greater than 1, the user can choose to return original road (from start to finish, and then return), or loop (from start to finish, from start to finish again) in the form of a repeat this route.

4 Collect Spots and Routes
When using Teleport Mode and searching for a new spot, you can click on the Star icon to collect this spot. Turn on the Star button in the lower right corner to display your favorite spots on the map.

When creating a multi-spot route or two-spot route, you can also click on the Star icon to collect this route.

The collected spots and routes will be shown in the Saved Spots and Saved Routes panel.
Tap the Top icon to the left of the Star icon to place your favorites at the top.

5 Support 10 iOS Devices
iRocket LocSpoof supports changing GPS location of 10 different iOS devices at the same time.
Click on the Phone icon on the right and it will show the connected device. Then click the Plus sign in the upper right corner.

Choose the iOS device that you want to change GPS location at the same time.

After trusting the computer, you can see all the devices on the right and select to turn off any one of them at any time. Or you can just Disconnect All.

Note: You can use up to 5 devices when purchasing basic benefits. If you still need to add more devices, you can click the add button below the purchased benefits to get more devices.
6 Import/Export GPX File
iRocket LocSpoof can import/export GPX file of single and multiple paths to save your favorite routes now.
Click on the Import icon on the right, and you can import the GPX file.

Click on the Exprt icon on the left route panel, and you can export the GPX file.

7 Fluctuation Mode

8 Cooling Timer Function
When you want to use the Teleport Mode to modify the position with one key, you can turn on the cooling button in the lower right corner of the product interface, and the cooling timer will appear at this time.

When you select the desired location and click to move, the timer will calculate the corresponding cooling time according to the distance. It is recommended that you do not perform other actions until the countdown is over to avoid being under house arrest by the game.
Learn More: [Full Guide] How Does Pokémon Go Cooldown Work?
In addition, the jump teleportation mode can choose to automatically jump after cooling down.
When you finish selecting points and choose to automatically jump after cooling down, click the move button, and it will automatically jump to the next point according to the cooling down countdown time until the route is completed.

Click Reset, the countdown will be cleared, and the countdown will recalculate the time when you modify the positioning next time.

When you don't want to use the cooldown timer, tap the Cooldown button again to turn it off.
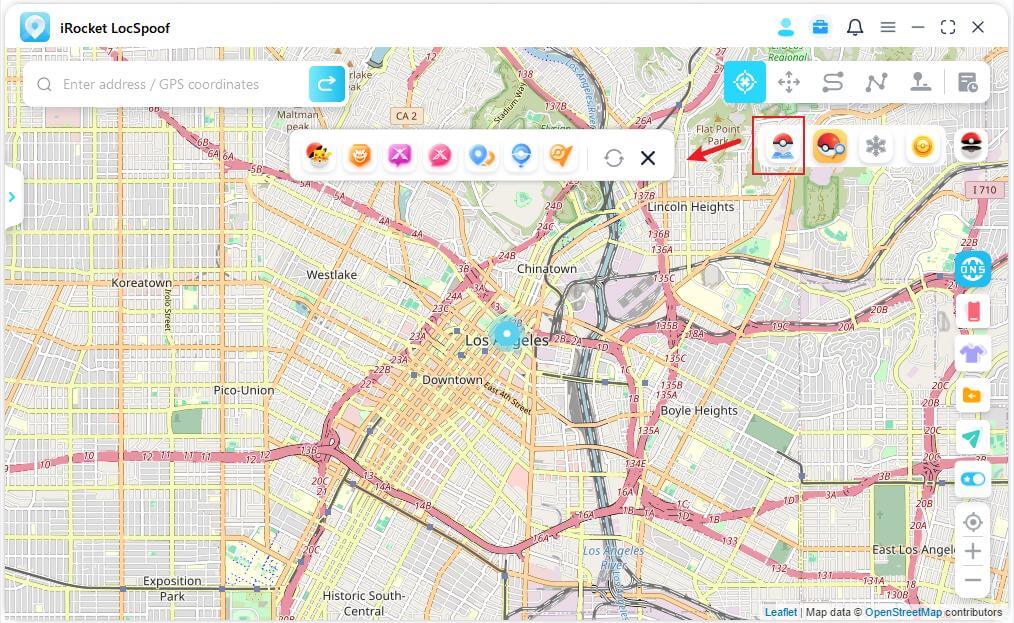
9 PoGo Atlas
PoGo Atlas lets you view nearby game data on a detailed map, including Pokémon spawns, raids, Mega and Gigantamax events, routes, PokéStops, and Gyms. Simply select the type of data you’re interested in and tap the “Go” button to choose your destination. You can simulate movement to catch Pokémon, join raids, engage in Mega or Gigantamax battles, complete quest routes, collect items at PokéStops, or participate in Gym battles.
Except for the route function, all data points support one-click route generation, enabling you to follow a pre-planned path and pause whenever needed.
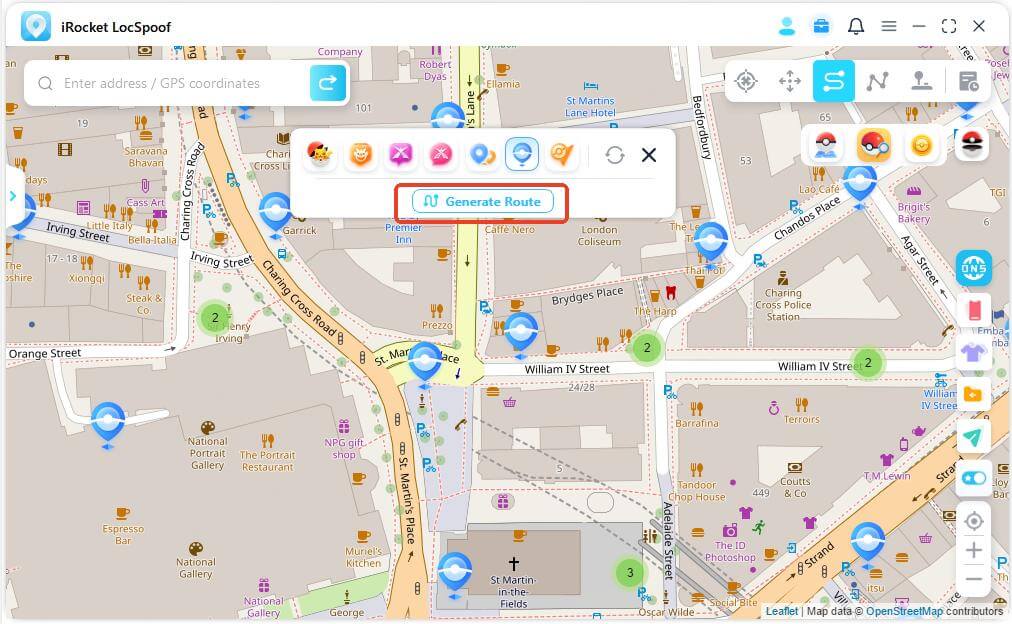
By enabling the route feature, you can view nearby route details, with on-hover information and a “Go” button to start simulated navigation.
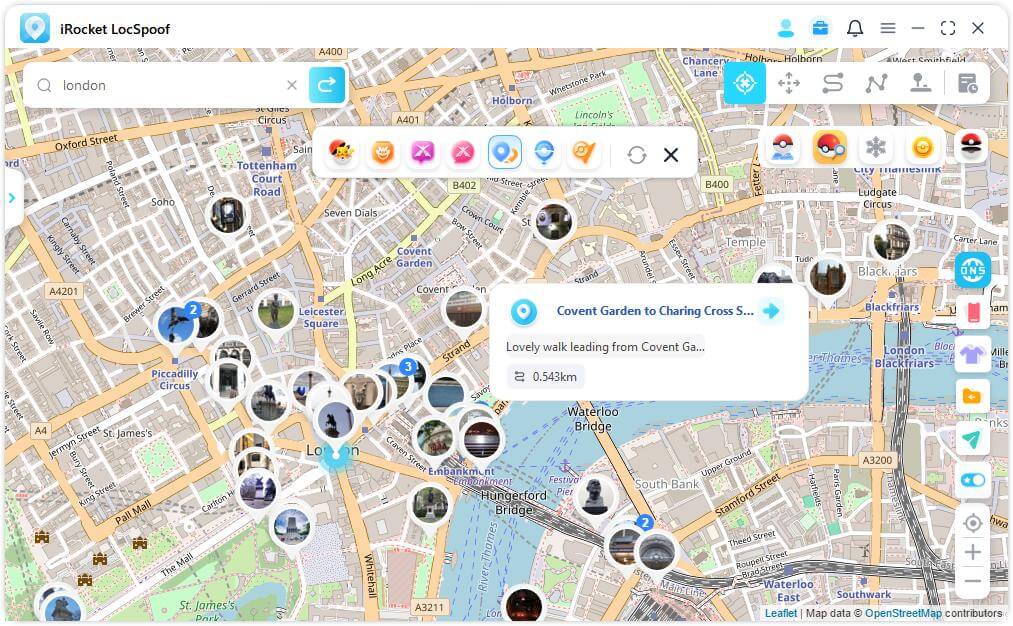
Both the game and LocSpoof follow the same mission route, allowing you to earn route badges and in-game rewards—and even encounter special Pokémon along the way.
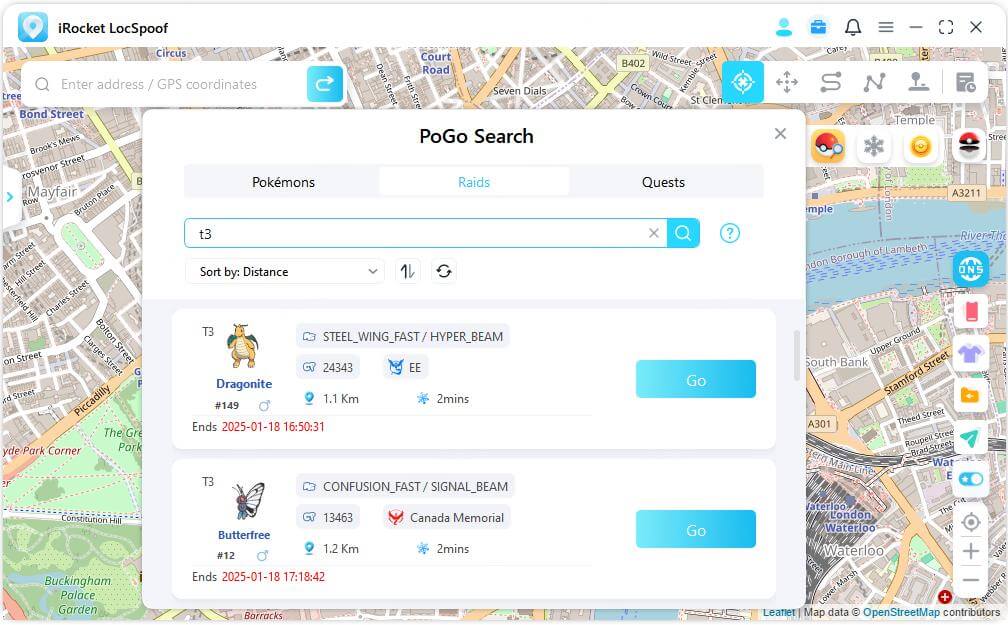
10 PoGo Search
PoGo Search is an advanced feature within PoGo Tools that lets you effortlessly locate nearby and global game data.
Tap on PoGo Search to view Pokémon, raids, and field research quests around your current location. Navigate to the displayed coordinates to catch Pokémon, join raids, or complete research tasks for valuable rewards.
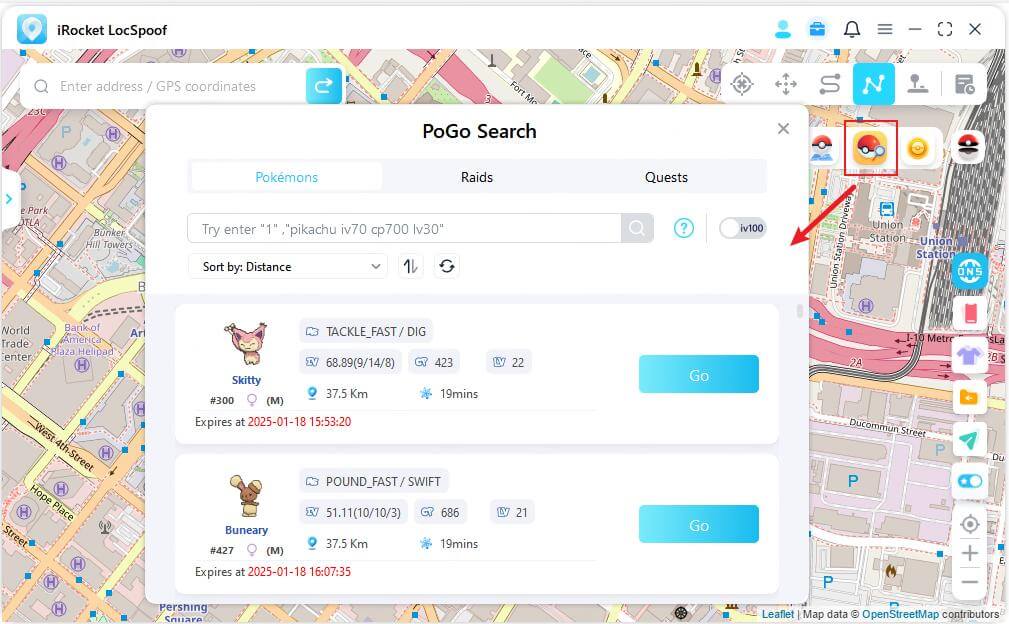
Enter a Pokémon’s name or number (e.g., "Pikachu") in the Pokémon list to quickly find its location. You can also activate the IV100 switch for real-time updates on top IV Pokémon.

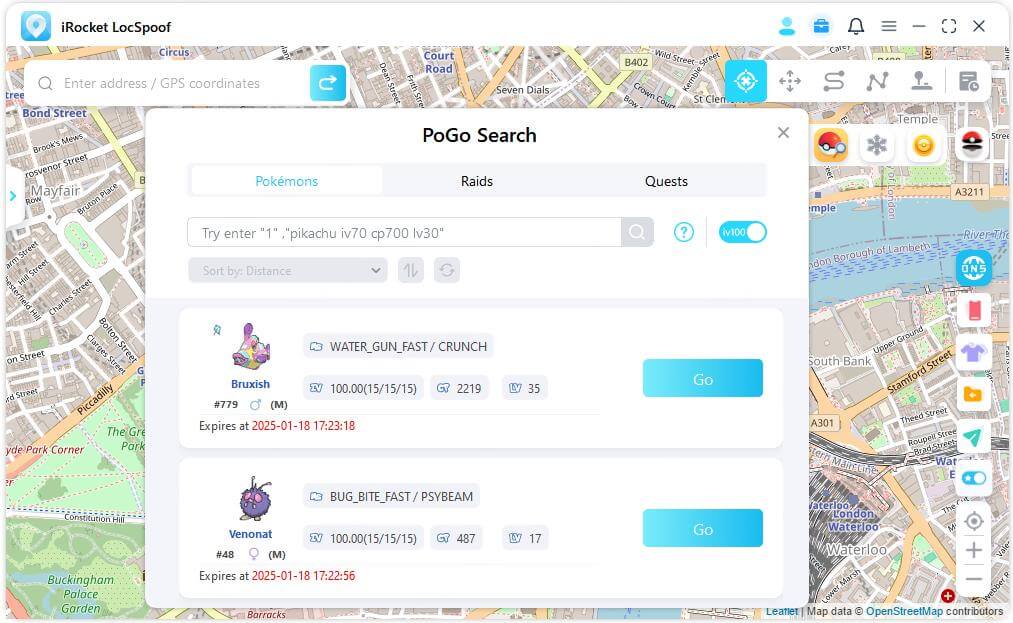
Filter raids by level (T1, T3, T5) to locate battles that match your preference. Simply click "Go" to head to the selected raid.
Input the name of a game item (e.g., "Super Potion") in the Quests list to pinpoint related reward tasks. Click "Go" to navigate to the quest site, then use the in-game tools to complete the task.

Tip
For more search tips and techniques, tap the help icon for detailed guidance.